> ## Documentation Index
> Fetch the complete documentation index at: https://docs.omnixapi.com/llms.txt
> Use this file to discover all available pages before exploring further.
# Authentication
> How to authenticate every request with your API key and an X account token.
Every OmniX request needs **two** pieces of identity.
## 1. Your API key (billing)
Your API key identifies your OmniX account and is what we bill. Pass it as
a Bearer token in the `Authorization` header on **every** request:
```bash theme={null}
Authorization: Bearer omnix_live_xxxxxxxxxxxxxxxxxxxxxxxxxxxxxxxx
```
In the API Reference playground, paste this key into the **Authorization** field —
it's sent as the `Bearer` token automatically.
Sign up, create a key from the dashboard, and you're ready. New accounts start with free trial credit.
## 2. An X account token (the actor)
Each call is performed **as a real X account**. You supply that account's
`auth_token` cookie value so the action (and viewer‑relative fields like
`canDm`) reflect that specific user.
Where to put it depends on the HTTP method:
Pass it as the `auth_token` query parameter:
```bash theme={null}
curl "https://api.omnixapi.com/api/v1/twitter/user/info?userName=elonmusk&auth_token=YOUR_X_AUTH_TOKEN" \
-H "Authorization: Bearer omnix_live_xxx"
```
Pass it in the JSON body as `auth_token`:
```bash theme={null}
curl -X POST "https://api.omnixapi.com/api/v1/twitter/tweet/favorite" \
-H "Authorization: Bearer omnix_live_xxx" \
-H "Content-Type: application/json" \
-d '{ "auth_token": "YOUR_X_AUTH_TOKEN", "tweet_id": "1899999999999999999" }'
```
### How to get your `auth_token`
`auth_token` is a cookie that `x.com` sets after you log in. The easiest way to
copy it is the free **Cookie-Editor** browser extension.
Available for Chrome, Firefox, Edge, Safari and more. Install it, then follow the steps below.
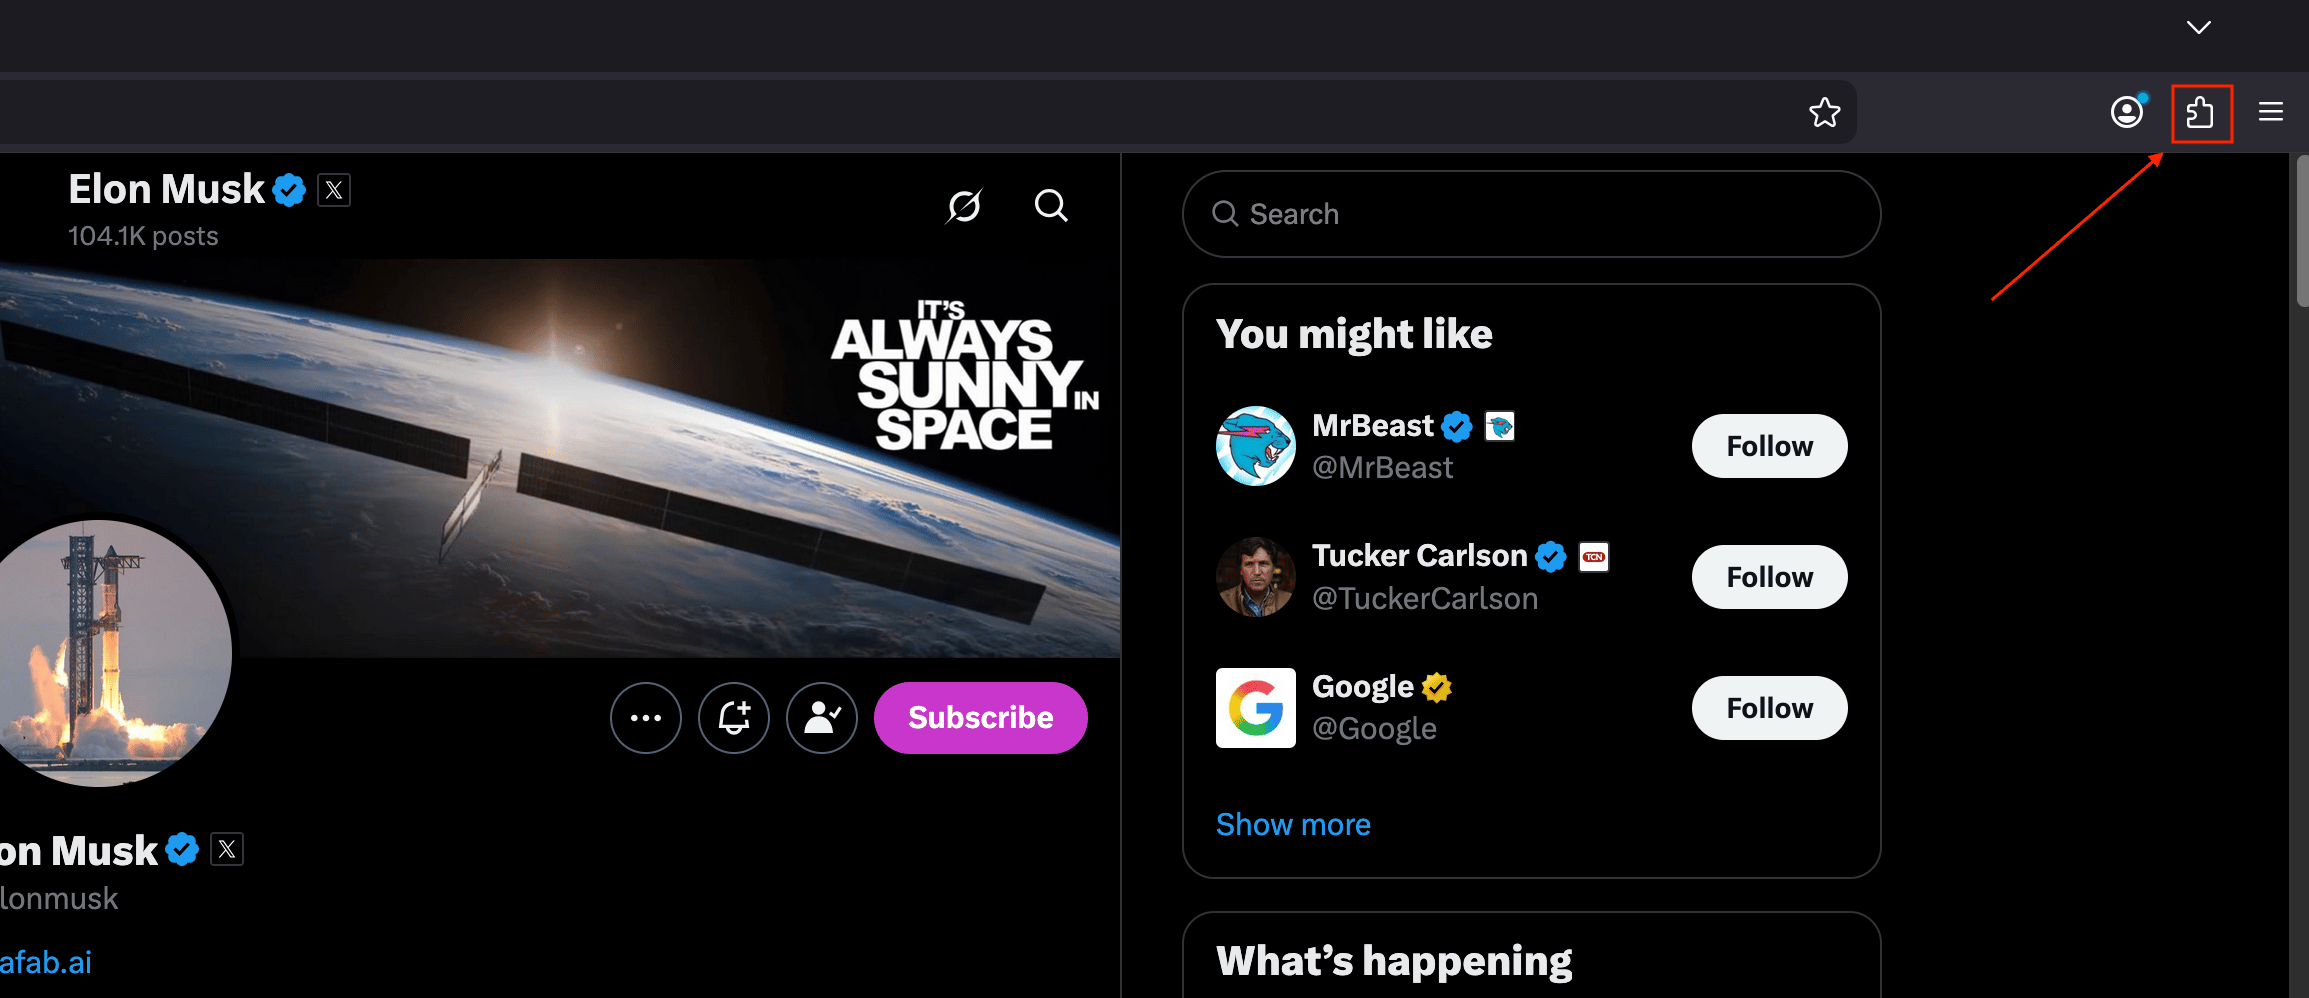
Go to [x.com](https://x.com) and make sure you're logged in to the account you
want to use. Click the **Cookie-Editor** icon in your browser's toolbar (pin it
from the extensions menu if you don't see it).
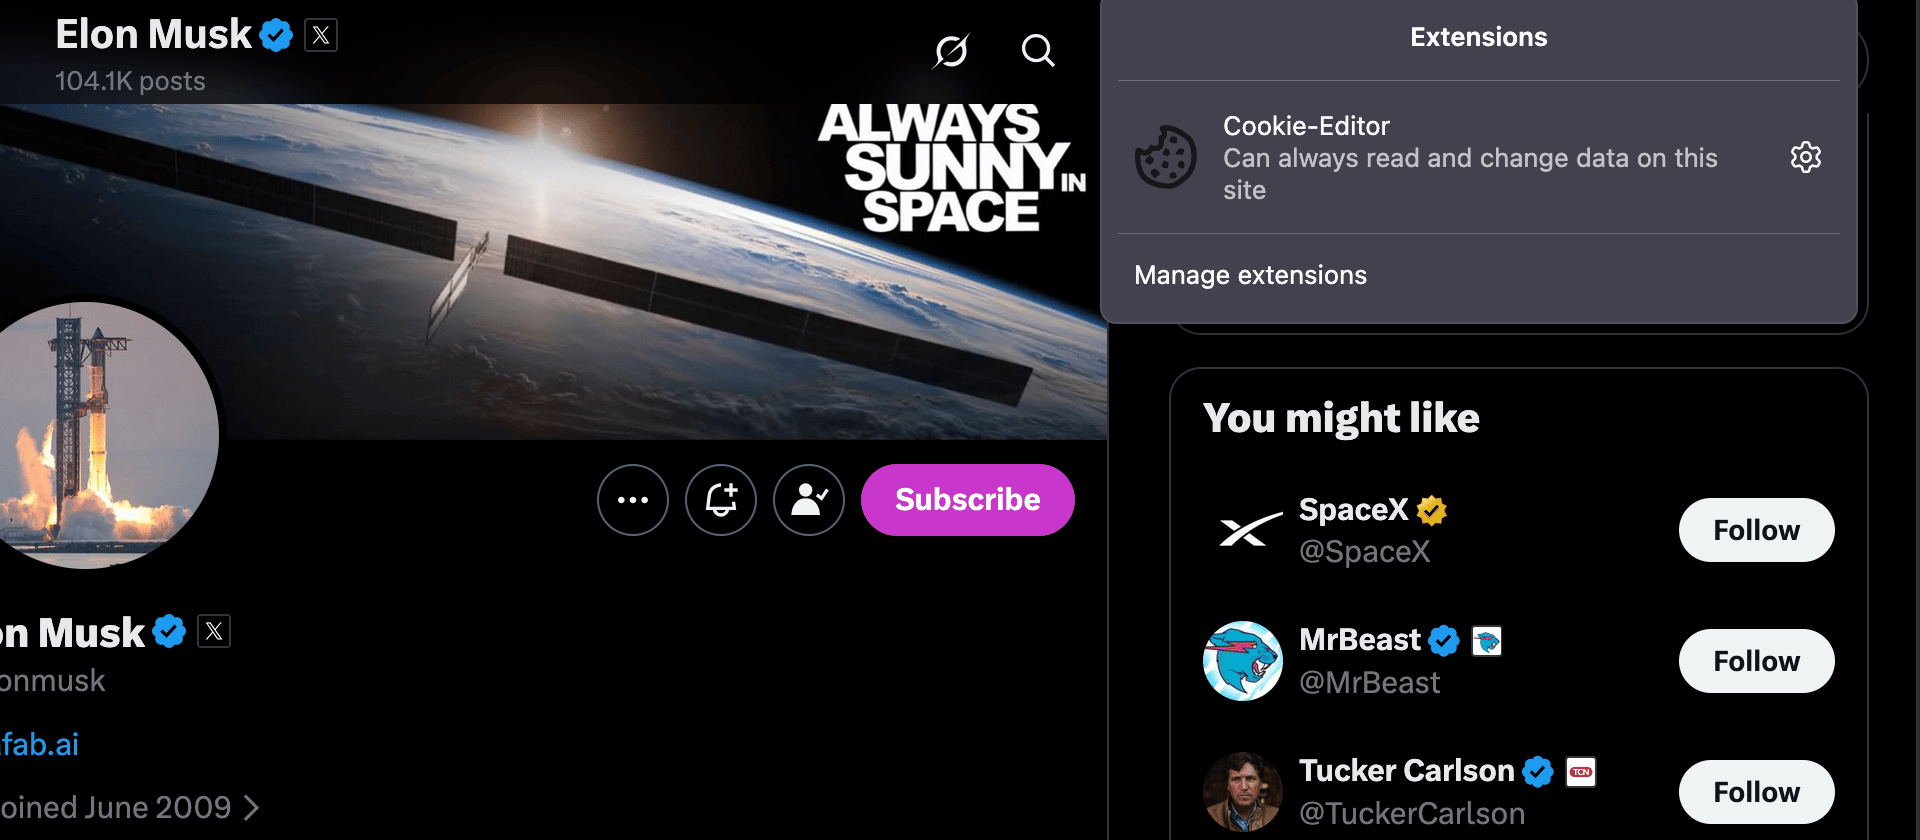
 Select **Cookie-Editor** from the extensions list. It opens showing all cookies
for `x.com`.
Select **Cookie-Editor** from the extensions list. It opens showing all cookies
for `x.com`.
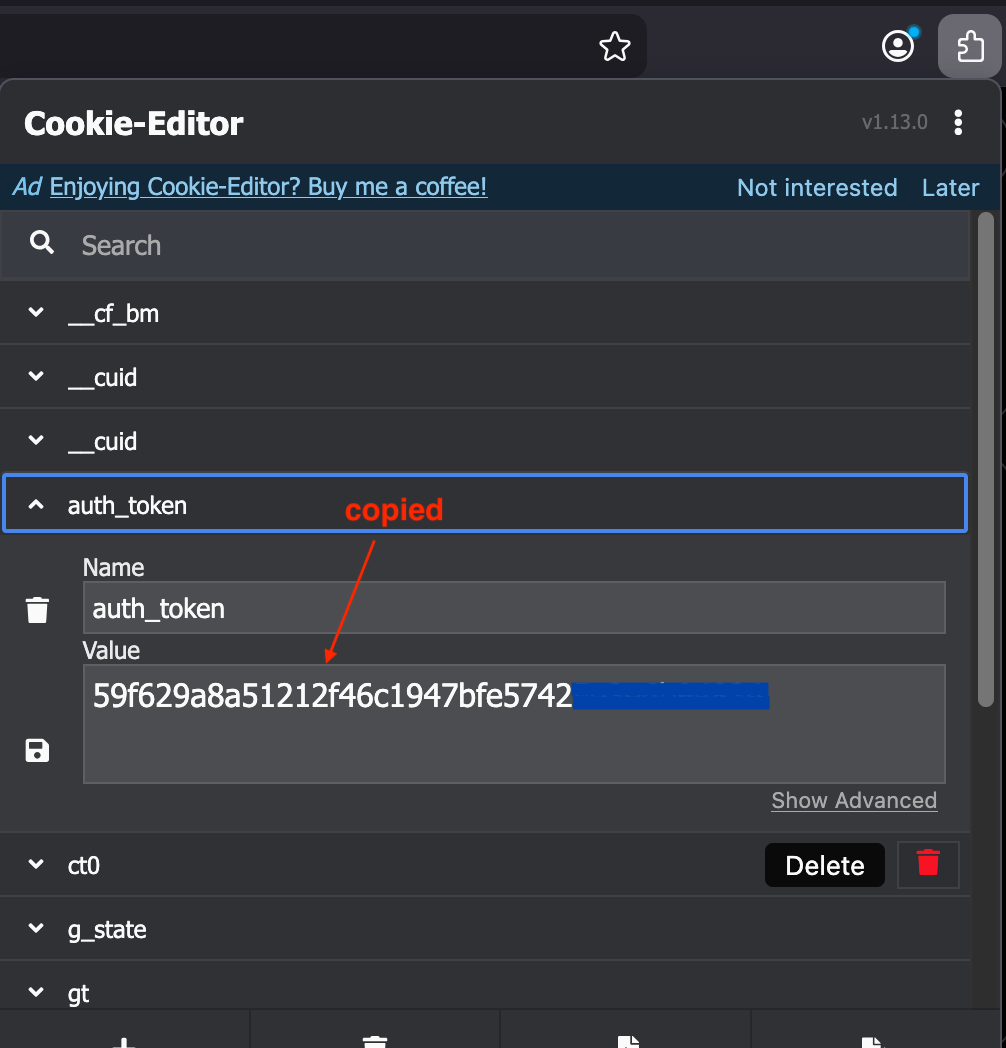
 Find **`auth_token`** in the list and expand it. Copy its **Value** — that string
is your `auth_token`.
Find **`auth_token`** in the list and expand it. Copy its **Value** — that string
is your `auth_token`.
 Prefer not to install an extension? You can also copy it from your browser's dev
tools: **Application → Cookies → `https://x.com` → `auth_token`**.
## Routing through a proxy (optional)
Every endpoint that acts on X accepts an optional **`proxy`** — the X request for
that single call is then routed through it. Useful for geo‑routing or spreading
calls across IPs. Pass it the same way as `auth_token`: as a body field on `POST`
endpoints, a query param on `GET` endpoints, or the `x-proxy` header on either.
```bash theme={null}
# As a query param (GET)
curl "https://api.omnixapi.com/api/v1/twitter/user/info?userName=elonmusk&auth_token=YOUR_X_AUTH_TOKEN&proxy=http://user:pass@host:8080" \
-H "Authorization: Bearer omnix_live_xxx"
# As a body field (POST)
curl -X POST "https://api.omnixapi.com/api/v1/twitter/tweet/favorite" \
-H "Authorization: Bearer omnix_live_xxx" \
-H "Content-Type: application/json" \
-d '{ "auth_token": "YOUR_X_AUTH_TOKEN", "tweet_id": "1899999999999999999", "proxy": "http://user:pass@host:8080" }'
```
Supported schemes are `http://` and `https://` (with optional `user:pass@`). SOCKS
proxies are not supported. An unsupported proxy URL returns `400`.
## Response headers
Successful, billed calls return two headers so you can track spend in real time:
| Header | Meaning |
| --------------------- | -------------------------------------------- |
| `x-credits-charged` | Amount charged for this call (e.g. `0.001`). |
| `x-credits-remaining` | Your credit balance after this call. |
## Errors you may see
| Status | Reason |
| ------ | ------------------------------- |
| `401` | Missing or invalid API key. |
| `400` | Missing X account `auth_token`. |
| `402` | Insufficient credits. |
See the full list on the [Errors](/errors) page.
Prefer not to install an extension? You can also copy it from your browser's dev
tools: **Application → Cookies → `https://x.com` → `auth_token`**.
## Routing through a proxy (optional)
Every endpoint that acts on X accepts an optional **`proxy`** — the X request for
that single call is then routed through it. Useful for geo‑routing or spreading
calls across IPs. Pass it the same way as `auth_token`: as a body field on `POST`
endpoints, a query param on `GET` endpoints, or the `x-proxy` header on either.
```bash theme={null}
# As a query param (GET)
curl "https://api.omnixapi.com/api/v1/twitter/user/info?userName=elonmusk&auth_token=YOUR_X_AUTH_TOKEN&proxy=http://user:pass@host:8080" \
-H "Authorization: Bearer omnix_live_xxx"
# As a body field (POST)
curl -X POST "https://api.omnixapi.com/api/v1/twitter/tweet/favorite" \
-H "Authorization: Bearer omnix_live_xxx" \
-H "Content-Type: application/json" \
-d '{ "auth_token": "YOUR_X_AUTH_TOKEN", "tweet_id": "1899999999999999999", "proxy": "http://user:pass@host:8080" }'
```
Supported schemes are `http://` and `https://` (with optional `user:pass@`). SOCKS
proxies are not supported. An unsupported proxy URL returns `400`.
## Response headers
Successful, billed calls return two headers so you can track spend in real time:
| Header | Meaning |
| --------------------- | -------------------------------------------- |
| `x-credits-charged` | Amount charged for this call (e.g. `0.001`). |
| `x-credits-remaining` | Your credit balance after this call. |
## Errors you may see
| Status | Reason |
| ------ | ------------------------------- |
| `401` | Missing or invalid API key. |
| `400` | Missing X account `auth_token`. |
| `402` | Insufficient credits. |
See the full list on the [Errors](/errors) page.